Tuesday, April 14, 2015

Hats

Here are a few hats that will soon be available on my Etsy shop.


The red, white, and green was originally made for my little boy, but it didn't turn out quite like I wanted for him. It's just a simple hat that will be perfect for a little one during the holidays.

The other little hat was made with some yarn that I found in my stash that I thought would be perfect for a sun hat for a little girl. It is made with a decorative criss cross stitch.

Wednesday, March 4, 2015

Still crocheting!

Just because I've been absent from here, doesn't mean that I've put my hook down. It just means that I haven't had as much time as I did in the past to keep everyone updated on my most recent crochet endeavors.

On January 4, 2013 my son, Lucas, was born. Ever since then he's been keeping us on our toes. Can't believe that he's already 2 years old!


When he does give me a little bit of free time, I'm usually crocheting. Here are a few items that I've made recently:

I've made 3 of these! About to make 1 more!

My son wearing the football hat that I made for him.

Baby hat that I made for Lucas when he was born


Baby blanket I made for a family member

I have many other projects that I've done from blankets, to scarves, to hats. I will be also opening my Etsy shop so be on the look out for that if you might interested in purchasing any of my handmade items!

Wednesday, May 2, 2012

Sock Monkeys

When I would play games with my mom on Pogo.com she was always joking about acquiring a sock monkey in her favorite game, Thousand Island Solitaire. She thought it was funny that was one of the prizes that you could receive at one of the ports. Since she passed away in 2009, every time I see a sock monkey, I think of her, and how she enjoyed playing her games on Pogo.com and all the friends that she made through that site.

I have started a small collection of sock monkeys since then. I can look at them and think of her. I know she would especially like the Seminoles sock monkey :)


She would always tell me that she wanted me to figure out how to make them. Well, I've finally done it Mom! Crocheted of course :)

I started with sock monkeys for my nieces. Here is the pattern that I used: Crochet Sock Monkey Pattern from Patons Yarns


Then my cousin Jeremy requested that I make him and his girlfriend Kendall sock monkey hats. Here is the pattern for those: Sock Monkey Hat Crochet Pattern (I altered Jeremy's a little so it was a tad bigger than the pattern.)


Of course, next I had to make a sock monkey hat for Hannah. I didn't use a pattern for this one. This was all freehand. If you'd like to know how I did it just let me know and I can see if I can figure out what I did :)


Then, I got to thinking. I wonder if I can make smaller sock monkeys. So, I got out my crochet hook and some pink yarn (of course I always have some of that around!) Using the above sock monkey pattern for reference I eventually came up with this.


A baby sock monkey! I think she turned out pretty cute, don't you think?? :)

Eventually, I may figure out how to sew them. I even have a pair of the socks that were used to make them. But for now, I think that I'll stick with using my crochet hook. 

If you anyone has any questions about any of the patterns, just let me know. I've made them all so I can try to answer you as best that I can. 


Thursday, January 5, 2012

Criss-Cross Keyhole Scarf

Recently my grandmother requested that I make her a keyhole scarf. My mom had made her one and she wanted one in a different color. Here is what I came up with for her:

Criss-Cross Keyhole Scarf


Materials:

1 skein Red Heart Shimmer Yarn (I used black)
Size I (5.5mm) crochet hook
yarn needle
scissors

Criss-cross stitch:

Skip next stitch and DC. Go back and DC in skipped stitch. Criss-cross made.

CH 34

1.  DC in 3rd CH from hook and each CH across. Turn. (32 DC total) 
    (CH 2 at beginning does not count as DC)
2.  CH 2. DC in first stitch. Criss-cross stitch in each stitch to last stitch. DC in last stitch. Turn.
3.  CH 2. DC in each stitch across. Turn.
4 - 6 Repeat rows 2-3

Begin keyhole:

First row:       CH 2. DC in first stitch. Criss-cross stitch 7 times. DC in next stitch. Turn.
Second row:  CH 2. DC in each stitch across. Turn.
Repeat 2 keyhole rows 6 more times. Fasten off.

Other side of keyhole:

First row:        Attach yarn at next stitch of first row. CH 2. DC in same stitch. Criss-cross stitch 7 times. DC in next stitch. Turn.
Second row:   CH 2. DC in each stitch across. Turn.
Repeat 2 keyhole rows 6 more times. Fasten off. (Keyhole complete.)

Attach yarn on the end of first side of Keyhole. 
CH 2. DC in first stitch. Criss-cross stitch in each stitch across. When you get to the keyhole just continue across. DC in last stitch. Turn.
CH 2. DC in each stitch across. Turn.

Repeat these 2 rows until you reach desired length. Fasten off. Weave in ends.

My grandmother requested that I add fringe to hers. It's up to you if you want to or not!

Enjoy!

Monday, June 13, 2011

Ripple Blanket

A lot of crocheters have their go to blanket that they make when they need something done quick and easy. This is mine. I have made this blanket about 4 times in the last 2 years! I can not take credit for the pattern, My friend Jennifer Williams shared this with me when I was looking to branch out from doing granny squares. Thanks Jennifer for providing me with one of my favorite patterns!

Now, how to make it.

Ripple blanket for Sky

Materials:

Worsted weight yarn
I usually use an I hook. If you want the blanket bigger or smaller just use a bigger or smaller hook.

Chain 118


DC in third ch from hook (your two ch count as 1 DC) DC in next 5 chs (total of 7 DC including the first 2 chs) *In next ch, DC CH1 DC (this is the peak) DC in next 7 Chs. Skip the next 2 CHS. DC in next 7 CHS* Repeat from * until you make your last peak. After you make the last peak DC in next 6 Chs, Skip the next CH, DC in last stitch for a total 7.

Next Row:

CH 2, Turn. Skip a stitch, DC in next 6 stitches. Then DC CH1 DC in CH1 stitch. Then repeat the pattern like before. After you make the last peak DC in next 6 stitches, skip one DC in last stitch, CH 2 turn and repeat.

Repeat the second row until you have the length you desire.

Wednesday, April 27, 2011

E-Reader Case

I actually made this last year when my dad gave me a Nook for my birthday. I wanted to have something to keep it safe when I took it with me traveling.


Materials:
Worsted Weight Yarn
Size H crochet hook
Needle to weave in ends
Button
Thread to sew on button

Chain 26
Row 1: DC in 4th ch from hook. DC in each stitch to the last stitch. Ch 3. Turn.

Row 2: DC in next stitch and all the way to the last stitch. Ch 3. Turn.

Row 3: Skip first stitch and DC in next stitch. DC in stitch just skipped. Repeat until 2 stitches remain. DC in last stitch. Ch 3. Turn. Should have a total of 11 “criss-crosses.”

Row 4-5: DC in every stitch across. Ch 3. Turn.

Repeat rows 3-5 until towel reaches desired length. Mine was made to fit a Nook and measured about 21.25”.

Finishing:
I used my Nook and measured to see how big I needed to make the opening and used pins to keep it together. Then, using single crochet stitch, I just sewed it together on both sides to the point where my pin was. Turn it inside-out and you should have a smooth edge and a flap on your case. Next, you can either use a button, snap, or Velcro to fasten it together. I of course chose a flamingo button to go with my pink yarn :) I just made sure that the button was in place so that I could slip it between 2 of the criss-crosses. 


And there you have it! It's just that easy. If you have any questions or see a problem with the written pattern, please let me know.

Go Noles!!

Monday, April 18, 2011

Criss-cross Baby Bib

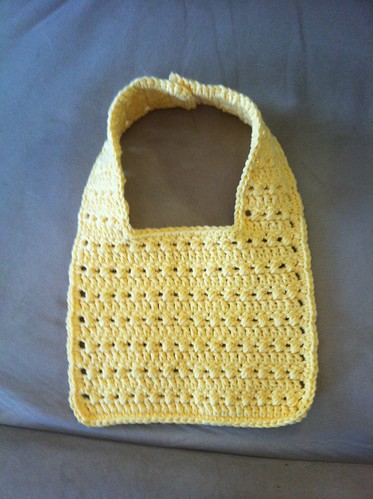
In continuing with the criss-cross theme, I also designed a criss-cross baby bib. I tried to write down the pattern for the fingerless gloves, but I already sent them off. I'll try to make them again so I can refresh my memory on what I did! In the meantime, here is a pattern using the same stitch for a baby bib. Let me know if you find any problems with the pattern.


Materials:

Lily Sugar'n Cream Cotton
Size H crochet hook
Tapestry needle to weave in ends

CH 32

Row 1: DC in 4th CH from hook. DC in each stitch. CH 3. Turn.

Row 2: *Skip next stitch. DC in next stitch. Go back and DC in skipped stitch. * Repeat until one stitch remains. DC in turning chain from previous row. CH 3. Turn.

Row 3: DC in each stitch. CH 3. Turn.

Repeat Rows 2-3 until piece measures 5" ending on row 2.

Neck:

Row 1: DC in next 7 stitches. CH 3. Turn.

Row 2: *Skip next stitch. DC in next stitch. Go back and DC in skipped stitch. * Repeat until one stitch remains. DC in turning chain from previous row. CH 3. Turn.

Repeat Rows 1-2 6 more times.

Row 15: DC in each stitch. Finish off.

Left Side:

Row 1: Skip 14 stitches and slip stitch yarn to row. CH 3. DC in each stitch. CH 3. Turn.

Row 2: *Skip next stitch. DC in next stitch. Go back and DC in skipped stitch. * Repeat until one stitch remains. DC in turning chain from previous row. CH 3. Turn.

Repeat Rows 1-2 6 more times.

Row 15: DC in each stitch. Finish off.

Border:

SC evenly all around.


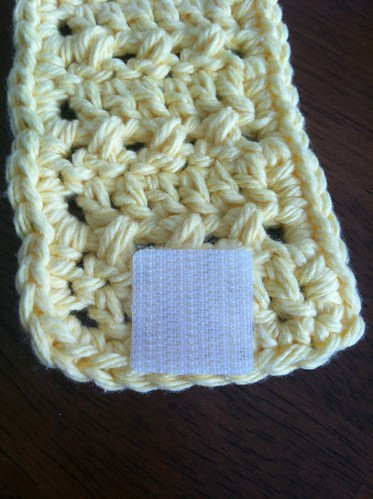
I used velcro to attach around the neck but you can use whatever you want. Button, snap, ties, etc.

Enjoy!! Go Noles!!