Now that the holidays are here we are having fun at our house making Christmas crafts!
Hobby Lobby and Joann's had so many fun supplies this year, we had to make most of what we found!
From ornaments...
to suncatchers...
to a Christmas countdown...
everything was so much fun to do with my mom!
Tuesday, December 11, 2018
Friday, November 9, 2018
Amigurumi
When I first started crocheting I used to see all of the cute animal patterns that people would make. I never thought that I would be able to make any of them. They all looked so hard! I never thought that my crochet skills would get to that level.
Then I saw a pattern for a kitty cat that looked simple enough. Here it is:
http://marmaladerose.blogspot.com/2009/04/crochet-kitten-pattern.html?m=1
This quickly became one of my favorite patterns. I've made quite a few of these.
Then I saw a pattern for a kitty cat that looked simple enough. Here it is:
http://marmaladerose.blogspot.com/2009/04/crochet-kitten-pattern.html?m=1
This quickly became one of my favorite patterns. I've made quite a few of these.
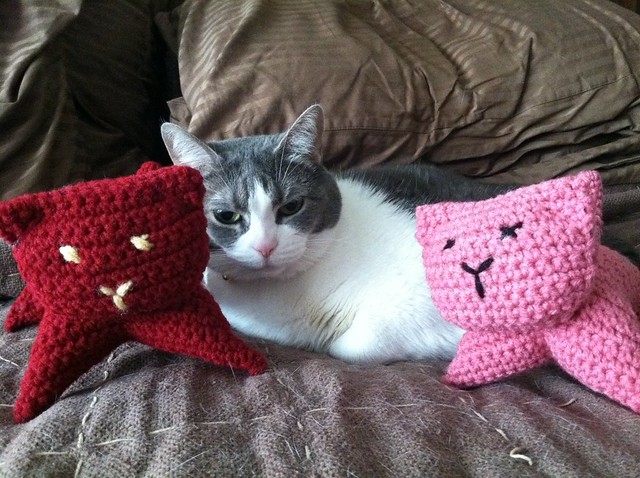
Here are a few of my creations from the kitty pattern. |
Some of my other creations with my kitty. |
Since then I've moved on to many other animals. I've made teddy bears, sock monkeys, dinosaurs, unicorns, cows, elephants... this list goes on and on! Here are the patterns and my pictures of my creations.
A turtle for my son. Click here for the pattern.
A butterfly for a baby gift. Click here for the pattern.
Dinosaur for the kids in my cul de sac. Click here for the pattern.
I'm also working on making penguins for my son's class. I combined a few patterns to make this so if you are interested in making one of these let me know!
These are just a few of my amigurumi critters. I have come to love making new critters! If you have any questions about any of these patterns, or would like to share something that you've made please comment below!
Thursday, August 16, 2018
Back to School
Well, my little one is officially a kindergartener! I can't believe it!
He has such a great teacher. He is going to learn so much and have so much fun!
I will get to be able to share more of my crafty endeavors with you now that he's back to school. Here are a few of my projects that I worked on over the summer.
As you can see, I've been making a lot of amigurumi lately! Be on the lookout for more Crafty Flamingo and Crafts with Lucas posts!
Tuesday, June 26, 2018
Slime!
Sorry for not having my weekly posting last week! I got germs in my throat (strep throat) and didn't give my Mommy a chance to tell you about our craft that we did last week.
Since I wasn't feeling good, my mom decided to do one of my favorite things, make slime!
When we first started making it, we used Elmer's Glue, food coloring, water, and borax. But now, there is this magical solution that you can use with your glue and that's all you need!
Here is what I used:
Elmer's Glue
Elmer's Magical Slime Solution
Food Coloring
Glitter
Bowl and spoon to mix it all up
You can get all of these materials at Joann's.
First you empty the container of Elmer's Glue into the bowl. Next you mix in the glitter and food coloring to get it the color you want. Then you mix in the Magical Liquid.
As you stir it the slime will start to come together. Here is what is should look like.
And that's it! As you can see, I had lots of fun making this. Just make sure that your mom doesn't mind you making a little bit of a mess when you do this :)
Make sure to check back soon for my next craft with Lucas!!
Thursday, June 14, 2018
Suncatchers
This week my mom and I decided to make a few suncatchers. We've made these before, but they are so much fun to make that we decided to make them again!
Here are the materials that we gathered together:
2 blank suncatchers
Suncatcher paint pens
Suction cups
Towel that you don't mind getting a little paint on
All of these materials can be purchased at your local craft store or at Walmart.
First you need to spread out the towel on your work area.
Next you just choose your color and paint!
And here they are hanging on their suction cups on our windows by our front door!
Here are the materials that we gathered together:
2 blank suncatchers
Suncatcher paint pens
Suction cups
Towel that you don't mind getting a little paint on
All of these materials can be purchased at your local craft store or at Walmart.
First you need to spread out the towel on your work area.
Next you just choose your color and paint!
Once you get your suncatcher painted the colors that you want, you just have to wait and let the paint dry.
And here they are hanging on their suction cups on our windows by our front door!
This was so much fun to do with my mom! I can't wait to see what we are going to do next :)
Wednesday, June 6, 2018
Clothespin Wreath
Summer has begun and that means I get to do fun crafts with my mommy! Here is our first one of the summer.
Materials:
(You can get these at Hobby Lobby and Walmart)
Wire wreath frame
Clothespins (enough to go around your wire frame)
Paint
Paintbrush
Wooden Letter
Hot Glue Gun
First step is to clip the clothes pins onto the wire frame
Depending on what kind of frame you have, you can do a double layer of the clothespins. That's what I want to do for our wreath for the fall so it can be Garnet & Gold.
Once you get all of the clothespins around the frame next you paint them.
I did 2 coats of paint on the clothespins to get the color that I wanted.
While the clothespins are drying, next we painted our letter. We chose a letter M for our last name.
Here is everything painted:
My mommy hot glued the letter where I told her that I wanted it to be positioned, right at the bottom. If you want it to be somewhere else, that's great too!
Here is our finished wreath (once the paint and glue dried)
Be sure and share your clothespin wreath with me if you make one!
Be sure and check back on Crafts with Lucas to see what we do next!
Labels:
crafts,
Crafty Flamingo,
Hobby Lobby,
Walmart,
wreath
Wednesday, May 2, 2018
10 Things...
10 Things I Love About Crafts...
1. Gives me a feeling of accomplishment whenever I finish any project.
2. Relaxing
3. Get my mind off of anything that might be going on in my life.
4. Able to make special gifts for my friends and family.
5. Something I can do with my son and nieces to spend time together.
6. Can sometimes make $$$ doing it.
7. There's always something new to learn.
8. Helps with fine motor skills.
9. I tend to look at objects differently. Some people might see string, but I see a blanket, a scarf, a hat, or a stuffed animal.
10. Saves $$ by making some things myself for my family.
Sunday, February 25, 2018
Finished!
Booties are done!
This was such a fun project to do.
If you decide to make these, I would suggest following along with the video that is on the website. She explains each step very thoroughly and helps you with each step along the way!
If you decide to make these let me know! I would definitely make these again! https://yarnutopia.com/2017/07/20/flamingo-feet-baby-booties/
Saturday, February 17, 2018
Flamingo Feathers
I just wanted to catch you up on my progress on the Flamingo booties. I've been busy!
The feathers were so much fun to make and I was able to learn a new stitch at the same time! I was intimidated by the crocodile stitch before, but not anymore. I'm ready to make other projects with this stitch now!
Next step, flamingo head!
Tuesday, February 6, 2018
Flamingo Booties Part 2
Update on the flamingo booties!
For those of you following along with me, I've done the first two steps, the sole and the top of the bootie. My next step is the side feathers.
So far this pattern has been very easy to follow along with. No issues at all! I'm loving this pattern so far and can't wait to see the flamingo start to shape up!
Thursday, February 1, 2018
Flamingoes!
Being The Crafty Flamingo one would think that I would have made at least one flamingo. Nope! I have never made a flamingo! I thought it might be time for me to try it out so here it goes.
Flamingo baby booties!
I am so excited to get this started. Here is the pattern:
https://yarnutopia.com/2017/07/20/flamingo-feet-baby-booties/
I will be using Red Hear Super Saver yarn in Bubble Gum, Black, and White. I'll start out using the size F-3.75mm hook, but sometimes I need to go up or down a size so we shall see how this project turns out.
I'll post an update early next week on my progress!
Subscribe to:
Posts (Atom)